
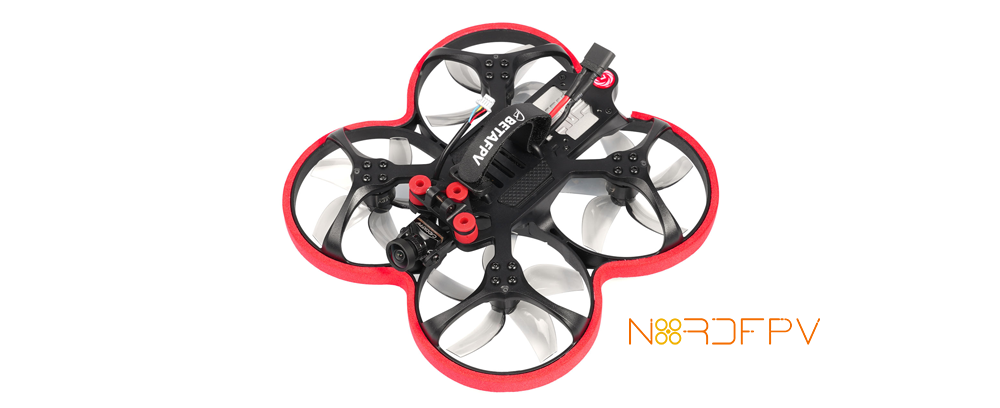
Review: Betafpv X95 v3 Whoop Quad
Published: January 2021
Up until now I haven’t been very close to whoops, but I’ve decided that was going to change and I’m evaluating a few of them to try to find the best ones to bring to nordfpv.com and keep offering what I consider the best of the market.
This review is based on the HD version of this quad.
Table of contents
- Specs
- Unboxing
- On the bench
- Flying experience (out of the box)
- Conclusion
1.- Specs
- Item: Beta95X V3 (HD Digital VTX)
- Weight: 116.7g (without battery), 169g (Drone+Battery), ~199g (Drone+Battery+SMO/Naked GoPro)
- Wheelbase: 95mm
- FC: F4 AIO 20A Toothpick Brushless FC V4
- Frame: Beta95X V3 Frame Kit
- Motors: 1106 3800KV Brushless Motor
- Props: Gemfan D63 5-Blades Props
- Receiver Option: Frsky FCC/Frsky LBT/TBS/PNP
- FPV Camera Degree: 25°- 45°
- HD digital camera & VTX: Caddx Nebula Nano HD System
- Camera Mount: SMO 4K camera Mount
- HD Camera Mount Degree: 5°- 45°
- Antenna: Air 5.8GHz Antenna (LHCP)
- Battery: 450mAh 4S battery (Tested with a Tattu 4S 450mAh)
- Charge Connector: XT30
- Flight time: Between 2.5 and 3.5 min flight with 450mAh 4S battery
You can find the stock betaflight dump here
Here’s a STL file for the naked GoPro and this soft mount
This is the FC diagram:

2.- Unboxing
I have to admit that I think Betafpv did a good job on the packing of this drone. It may not be the most important thing when considering a quad, but I think it shows the company cares when small details like this one are taken into consideration.
The box has the drone, of course, and two bags, one with some extra props, screws and another rubber band, used to cover the edges of the X95, and the second bag with the USB extenders to reach the configuration ports, and a power cable converter to use with the action camera.
Two things to mention here are that this drone comes with a Caddx vista, which uses USB-C to configure it, and the Flight Controller (FC) which (still) uses micro USB. Also there’s a power cable soldered directly to the FC which is intended to be used with a Betafpv 4K SMO camera. The adapter is to be used when you want to use a naked GoPro.
I did short video of what’s in the box:
3.- On the bench
First thing to do is to get the drone out of the box and put it on the bench to have a closer look at what we have with us.
In my case, the first thing to notice is that this is a push design, which I normally prefer because it uses the battery on the top, reducing the risk of damaging it while landing, and somehow it feels more appropriate for cinematic.
The drone is pretty good looking. The vista is set up in a way that receives a lot of airflow without being dangerously exposed in a crash. I like the HD action camera soft mount, I think it’s well thought and can help getting better videos. There’s one screw to attach the SMO/Naked GoPro case to it, but nothing else than pressure from the rubber stand-off to hold this mount. I’m wondering about the durability of this set-up if it crashes.

Image 1. Soft mount
In my case I got a unit with a XM+ receiver, and the antennas of the receivers are hidden inside the frame, which looks pretty cool, and smart, but I wonder if that affects ranges at all. It didn’t look like it while flying it, but I haven’t tested the range of the receiver properly since I wanted to focus the review in the drone itself. I’ve been told that if you use a TBS crossfire, you will hide the stock antenna in a similar fashion, and so far I have not found any 3D print piece for an immortal T, despite I’m sure that will change pretty soon.

Image 2. Antennas hidden in the frame
Flipping the drone upside down we get to the receiver, which is in a position that allows us to push the binding button very easily, something I like, again, small details that makes our life a bit easier are always welcomed.
But I can’t say the same from the USB ports. There are no smart extensions, or anything that makes our life easier to access them. The two L-shaped extensions help, but I’m very scared those two tools will easily break if a bit of pressure is placed in the wrong direction, and I have the feeling this can happen at any time, so better to stock yourself with a couple of these connectors if you don’t want to have your drone parked for a while in case you break one of them.
You should always remove the props when working on the bench, but in this case it is even more necessary, because without doing it, you will have a difficult time reaching any of the two USB ports. You can definitely do it, just that is pain.

Image 3. Access to USB ports
The red rubber around the frame doesn’t only make it look cool, it also protects (a little) the frame.
The place where you have the battery has some rubber to help hold the battery, and the strap is made of some plastic material that is at least not shiny and slippery. I will most probably add some ummagrip just in case. There’s definitely no place for a second strap, but honestly this is not a freestyle drone and I don’t think you will need it.

Image 4. Battery strap and rubber
4.- Flying experience (out of the box)
It’s very important to understand that this section is based on taking the drone out from the box, pairing, binding it, and strap a battery to fly it directly. Stock PIDs, stock rates, stock all.
Why did I choose to fly it like this without checking and modifying much? Because many of my customers want to just fly. Believe it or not, there are many enthusiasts that don't care much for spending a lot of time on the bench tweaking the drone, and are more worried about spending time out in the air.
Unfortunately, the first thing to notice when taking off is a big amount of jello, it wasn’t until I pushed the throttle quite high that the jello disappeared.
Clip 1.- Jello out of the box
The betafpv X95 v3 felt stable while flying, but it was quite easy to notice when the wind pushed it a bit. I guess this is to expect with the weight and the motors on this drone.
I also tested dropping the quad from a bit high to test if it would get propwash and it was kind of a mess.
Clip 2.- Propwash out of the box
Pushing the throttle a bit, and doing some easy acrobatics didn’t seem to be any problem. In fact, I thought that the drone started to get fun when I was accelerating a bit, but a cinewhop should be good at low throttle, don’t you think?
Clip 3.- Flying around
What was definitely fun was to get it through some small gaps, using the HD camera you can get details that allows you to fly in some small spaces.
Talking about the camera, this is a Nebula camera connected to the vista unit, which everyone complains about. Yes, the difference from a full DJI camera to this one is quite big. The nebula is like dark, a bit washed out, but at least I wouldn’t just run away from a drone because it has this camera. Maybe now that the nebula pro is out I would think the regular nebula has no place in the digital world, but again, I didn’t think it was that terrible.
The vista unit has a small LHCR antenna connected, smartly hidden in the frame. When I saw the size and how it is not elevated at all from the frame, I immediately thought about a reduced video range, but I have been flying with 700 mW, around some brick buildings, and inside the forest, and I didn’t feel any difference with other systems with longer antennas.
4.- Conclusion
This is a good looking drone, and the combination of it with the betafpv SMO 4K camera is very promising.
The issues mentioned while flying can be fixed if you know how to tune a quad. I’ve also heard that changing the camera mount with some 3D printed pieces can do wonders to remove the jello, I have to still test this myself, maybe even screwing it better should help.
In my personal opinion this is a drone for someone with experience in the FPV world, that can tune and tweak it to their taste. The time flight is as described in the specs, around 3 mins, with a 850 mAh, and I’m sure with this size you will find some nice places to film some interesting clips with an action camera.
PROS |
CONS |
|
Light weight |
Easy to be pushed by the wind |
|
Low noise level |
Difficult to access USB ports |
|
Soft mount for HD camera integrated |
Need tuning out of the box |